How to lay carpet tiles?
Installing carpet tiles in your professional space has many advantages. It's simple, practical and fast. What's more, lead tiles can be reused. How to lay carpet tiles ? Here's our complete guide.
Preparing the floor before laying
Calculating the number of slabs required
Before you buy your flooring, calculate the number of tiles you'll need. A slab usually measures 50 x 50 cm or 25 x 100. These standard sizes tell us that to cover 1 m2, you'll need 4 slabs. To find out how many tiles you need, proceed as follows:
- If the part is regular, multiply the length by the width;
- If not, multiply the longest length by the widest width.
Remember to leave a margin of at least 5% for non-partitioned rooms and 10-15% for rooms with partitions.
Substrate preparation
Before laying carpet, the floor must be perfectly smooth, flat and dry. If you have removed an old covering, clean the surface thoroughly to remove any traces of glue. If the old surface has damaged the floor, you'll need to level it. In the case of an engineered floor, you can lay the carpet directly.
Materials and tools required
To lay your carpet tiles without using tacky glue, you need :
- Use Milliken's Traction Back solutions (to be specified when ordering the product), TacTiles Interface patching solution, Balsan's B-Connect ...
- Cutter;
- A measuring tape ;
- A grease pencil.
Different types of installation
The laying direction and method are indicated on the product data sheet or directly on the carton; an arrow is indicated under each tile. If you have a layout plan with several references, you'll need to follow it to achieve the desired effect. Many manufacturers have an in-house concept design department that can help you create a unique decor. For a perfectly reusable floor, opt for randomly laid products. Each tile is marked with an arrow. Note that you can now mix re-used tiles with new products.
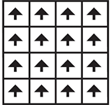
Monolithic installation
Lay all tiles with the arrow pointing in the same direction. There's no offset and the result is uniform.
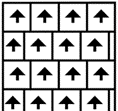
Staggered-joint installation
As with monolithic installation, the arrows all point in the same direction. However, the installation is offset along the width line.
Checkerboard pattern
If you wish to alternate two patterns or colors, use this installation technique. Installation should be carried out so that an arrow runs perpendicular to each tile.
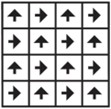
Laying ashlar
The arrows all point in the same direction, but the slabs are laid with a 50% offset in length.


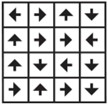
Random installation
The tiles are laid without regard to direction. This is the quickest method, and lends itself perfectly to re-use.
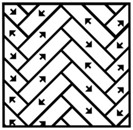
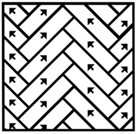
Herringbone pattern
Herringbone installation is created by laying the boards in an L-shaped pattern. It can be laid one-way or multi-way.
Key steps for laying carpet tiles
Drawing up installation plans
Perpendicular installation involves drawing a line lengthwise through the center of the piece. Then draw a perpendicular line across the width. The intersection of these two lines is the starting point for laying the first tile.
Diagonal installation: from the center of the room, draw two perpendicular lines. At their intersection, lay your carpet tiles.
Blank laying : you lay your tiles on the floor without gluing them, joining them edge to edge. This gives you an idea of how many cuts you'll need to make.
Position adhesive if necessary
If your tiles are neither leaded nor self-adhesive, you'll need to use the manufacturers' patches.
Laying the following tiles
Each slab must be glued in accordance with the type of installation and the installation plan. Slabs are to be placed edge-to-edge.
Slab cutting techniques
Using a cutter, place your cutting slab on top of the last slab before the wall. Place a slab on top, starting from the wall. This will serve as a cutting template. Draw a line with a grease pencil over the area to be cut. Cut the slab along the line, checking that it corresponds to the vacant space against the wall.
Use leaded slabs to facilitate reuse
We recommend that you use an adhesive-free carpet tile installation method. Tactile solutions solutions from InterfaceTractionBack from Milliken and B connect by Balsan are ideal. Each of these leading brands offers a simplified installation technique.
Highly flexible, these tiles are easy to install, waste-free and quick. The tiles are joined together without glue and do not move. This technique is even more advantageous, as it encourages the reuse of carpet tiles. Your floor covering can have a second life if it's in good condition. You can reuse your carpet tiles after they've been removed to another part of your company or another site.
To lay your carpet tiles using a glue-free installation technique, call on Orak! We're here to help:
- Removing your old carpet;
- When choosing your new or used carpet;
- For the installation of your carpet tiles;
- Then we deploy a maintenance solution tailored to your coating to preserve your investment.
Contact us today to discuss your project!
Read also